Concrete Micro-Topping Diy


4
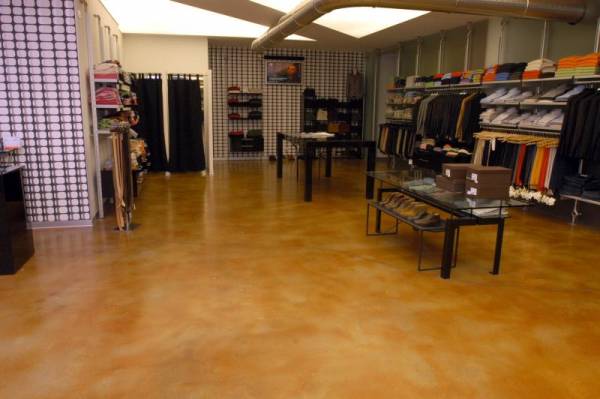
Micro-Topping is a thin, flexible layer that is designed to bond to concrete. But the cement-like material also works with wood, plastic or metal. MicroTopping can be used for interior or exterior projects, on vertical or horizontal surfaces, and provides a durable coating that protects the underlying material in wet conditions.A variety of color options and combinations allows unique designs that can be installed directly on bare, hardened concrete. The finished application is only as thin as a credit card. Micro-Top can be used on smooth concrete or printed on floors, walls and concrete countertops. Let us see how you can do concrete microtopping yourself.

Things you will need

  • Trowel or a 6-inch spatula
  • Rollers

Preparation of the Concrete

  • Clean the dust and debris from the concrete. Vacuum the surface completely to remove all loose material.
  • Use a degreasing detergent to remove all traces of grease and oil.
  • Wash away the residue and allow it to dry completely. 
  • Scrape, grind or sand any foreign material that protrudes from the floor to create a solid flat surface. 
  • Clean up any debris created in this process.
  • Fill the cracks and chips by installing evenly semi-rigid elastomeric crack filler with a wide squeegee.

Applying the Micro-Top Finish

  1. Mark any design or pattern you want to use on bare concrete with a marker. Label the color to use for each area, creating a paint-by-number pattern directly on the concrete surface.
  2. You can create any color or pattern design you want.
  3. Pour a small amount of micro-Top base coat onto a prepared floor section. It is spread over the coverage area in a thin sheet with a spatula or a spatula. Continue this process until all areas are covered. Wait until this coat is dry to the touch.
  4. Apply the acrylic sealant to the whole Micro-Top system with a brush or paint roller. Let this finish dry completely before allowing traffic to the surface.

Suggestions & Warnings

  • Use the Bomanite epoxy primer under the base layer if the original concrete is prone to water penetration from below.
  • Protect the application in a high layer of micro-top from water spray to prevent permanent white fading in the final finish.
  • Read the instructions of all manufacturers completely before the start project.
  • Sandblasting and grinding the entire surface is not necessary unless necessary to create a particular effect.
Continue reading

Laying A Concrete Floor In A House

5when laying a concrete floor in a house, a garage or a workshop, it is very important thatit should be firm enough, so as to avoid, over time, yielding or cracking.Concrete flooring , when done well , will be a very good foundation, and in these times of scarcity of wood will be cheaper than a wooden one. Generally, the structures of this type are raised in gardens, whose soil is loose, conditions in which it is necessary to do a good job to avoid the inconveniences that we have mentioned.

If the floor is soft it will be necessary to dig it to a depth of 25 cm, for which it is necessary to begin by marking the four angles of the space to work. This is done by burying four wooden stakes; then choose a right straight strip, which serves as a rule, and using it in combination with a level, verify that the height of the four stakes is the same. All the stakes are buried to the same height, and then the soil is dug so that the open parts of said stakes are all of the equal lengths.


The stakes should be raised a few centimeters above the surface of the finished soil. The hole that has been left when digging is filled with ashes, to a depth of 15 cm, so that there will be another 10 cm for the concrete. The four stakes that mark the angles are joined with a thread; parallel to this thread several more stakes are placed on each side, 25 mm from the marked limit. These stakes are buried so that their tips are flush with the desired level for the surface of the floor, and the height of each of them is checked with the others by means of the strip used as a rule, of which we have spoken, and of the level to alcohol. On the inside of the stakes, boards of 101 mm by 25 mm section are nailed, forming a frame or mold into which the cement is poured.

If the floor is destined to a garage, it is necessary to prepare a transverse member that will be level with the general surface, which is done by nailing a wooden strip on the inside face of the front strip. If only one person works, the amount of concrete mixed per time should not exceed two or three truckloads, otherwise, the work will be very freckled. The mixture is prepared on a board, which cannot be less than 1 m side by 25 mm thick, which is nailed to some slats.


A good mixture is prepared with a part of cement, two of sand and four of a conglomerate formed by pellets and gravel. The sand should be clean, dry and free of impurities, such as dirt or mud. The amount of material needed for any given case can be calculated on the basis that a ton of dry conglomerate is approximately equivalent to a cube of 90 cm on each side. Mix all the ingredients, first dry, and stir until the cement is well distributed and the set has a uniform gray color. A pile is formed, a depression is made in the center and, with a watering can, water is added in small amounts, stirring and putting back more water, until the mixture is semi-fluid. The mixture is transported to the place delimited for the floor, on which it is deposited in a heap somewhat higher than the planks that mark the shape, and it is begun to work, making it enter well at the angles with a shovel or hoe. When a space of 80 cm or 90 cm width has been filled, it is smoothed with the edge of a plank.

If the concrete is uniformly hit with the edge of the board, the fine parts of the mixture will remain on the surface, giving a smooth and even finish, which will have to be level with the top of the frame or mold. Later, when the excess water has been removed, this surface will be again smoothed with a metal trowel. Keep mixing concrete and putting it in the form until it has been completely filled; it is finished as indicated, and it is protected against rains and frosts as well as against domestic animals, covering it with bags held in place, like a tent by means of rods or reeds.

If there is no frost, nor the sun is very strong, this protection can be removed within 24 hours. This protection can be withdrawn within 24 hours. Otherwise, it is convenient to leave it for at least two days, after which the planks of the form or mold can be removed, but will not walk on the concrete surface until several days have passed, after which it will be perfectly solid and able to withstand constant use without cracking.

Continue reading

CONVOW ® India

CONVOW ® Africa

BGSB Concrete Africa Ltd
+254-788994025
info@bgsbafrica.com

Quick Contact

.

© 2024 BGSB.In All Rights Reserved.

Hi! Click one of our representatives below to chat on WhatsApp or send us email to support@convow.com

Chat with us on WhatsApp
Close and go back to page